Video tutorial:
If you issue the same invoices for the same client periodically, InvoiceOcean allows you to automatically issue and send such invoices at specified intervals. The entire process is facilitated through recurring inquiries, available in the Professional and Enterprise subscriptions.
From this article, you will learn:
From this article, you will learn:
- how to activate the option for recurring invoices;
- how to initiate a cycle of calls;
- how to delete a created cycle;
- how to bulk delete or export selected cycles.
How to activate the option for recurring invoices?
To enable the option of recurring invoices go to Settings> Account settings> Your account , in section Recurring invoices , select Enable recurring invoices and save the changes.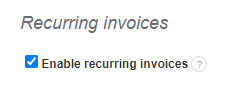
How to initiate a cycle of calls?
FIRST SOLUTION
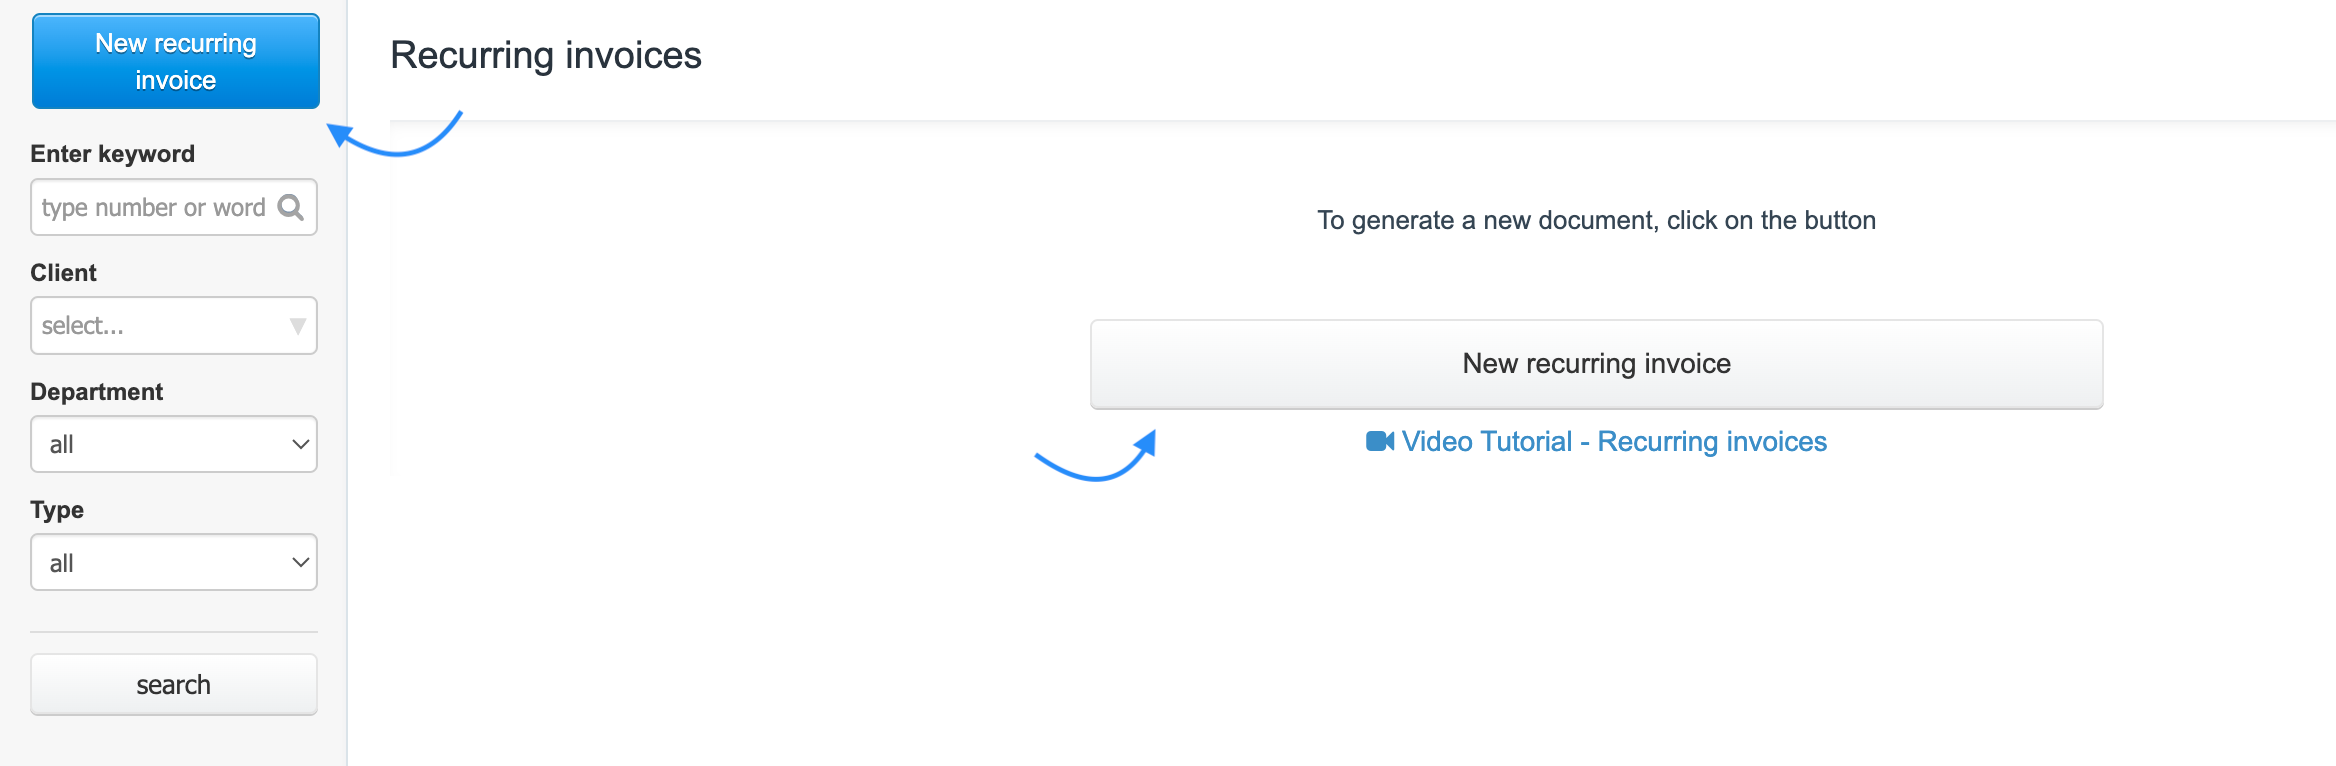
To initiate a cycle of invoices, go to the Income tab > Recurring Invoices . The program will take you to the list of recurring invoices. The New Recurring Invoice button is located on the left side of the screen. If you are performing this step for the first time, you will also find the New Recurring Invoice button in the middle of the main window.
In the recurring inquiry form, you can specify detailed parameters
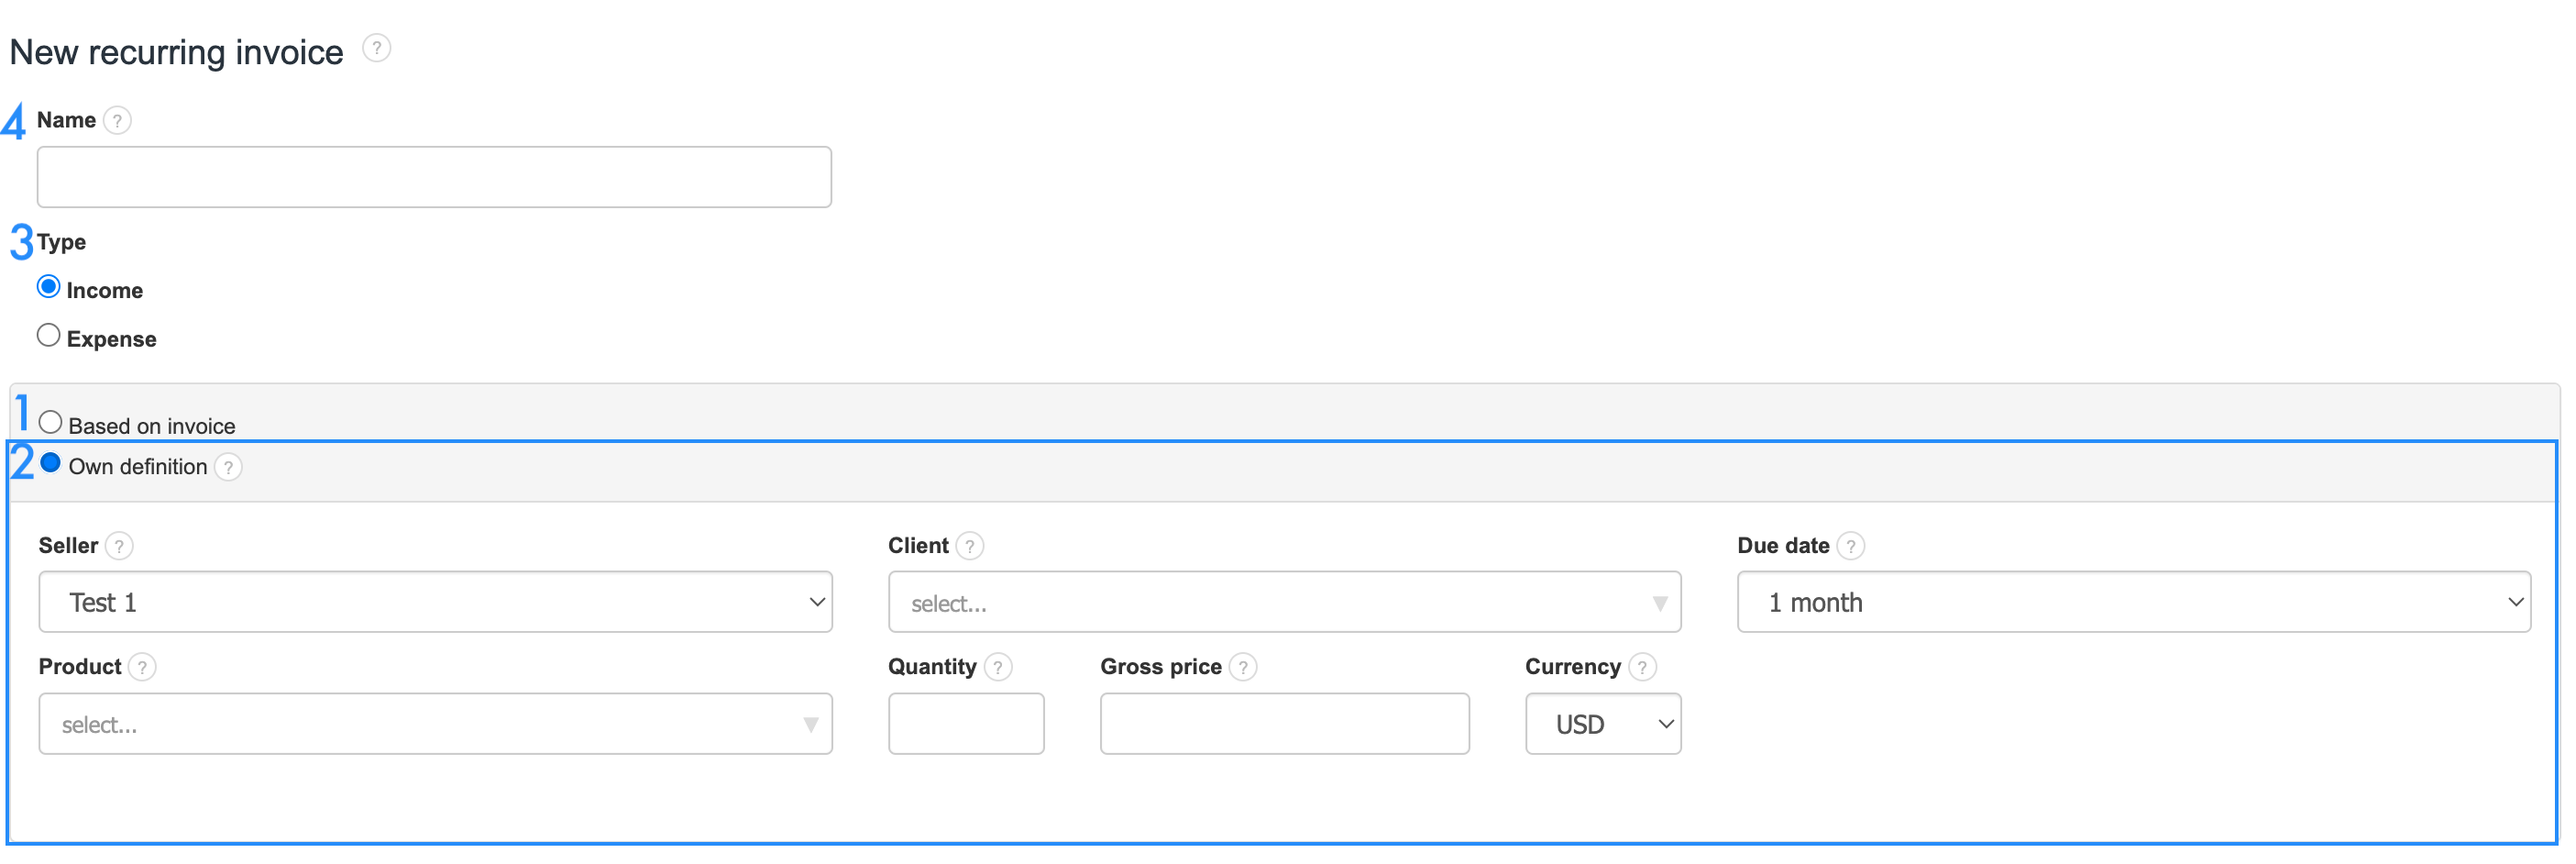
Start by choosing a convenient option for creating the cycle:
1. Based on Invoice : This option allows you to generate a recurring invoice solely based on the data from a previously created invoice, which you'll select here. Simply enter the invoice number, name, or VAT ID of the client - the program will suggest a list of proposed documents as you type. This way, the informational fields will be automatically populated with the data from the previously created invoice, without the need to fill them in again. It's important to note that making changes to the original invoice will also affect all recurring invoices generated based on it.
2. Own Definition : Opting for this option provides you with the opportunity to create a sort of "template" of predefined data upon which your recurring invoices will be generated. Own Definition also allows for easy editing of the cycle, unlike the invoice-based cycle, where you would need to edit a sample invoice to change anything in the cycle. To create such a cycle, simply fill in the Seller, Client, Due date, Product, Quantity, Gross Price and Currency fields with the appropriate information, and each subsequent invoice will be issued accordingly. If you have multiple companies in the system, you can specify the Seller. The client list will appear as soon as you start typing in the Client field. Also, indicate the due date, select the product, its quantity, price, and currency.
Note: Only one item can be selected in the product section. To generate a recurring invoice with multiple products, you must create it based on an existing invoice.
More information about Own Definition can be found in the Own Definition of a Recurring Invoice entry - without the need to indicate the base invoice.
3. After selecting the basis of the recurring invoice between Based on invoice and Own Definition , you must specify the Invoice Type, and here we have two choices: Income and Expense.
4. In the Name field (this is a workspace visible only to you), give a 'title' to your recurring invoice. Specify who the Buyer is and what it concerns to make it easier to find in the future and to maintain order in the documentation. Invoices can be filtered alphabetically or by the order of their creation in the system. You can also set a name based on a previously issued proforma invoice, where the data (such as day, month, year) will be variable, eg, Four Pawns - Marketing Service June 2021, Four Pawns - Marketing Service 01/2022.
4. In the Name field (this is a workspace visible only to you), give a 'title' to your recurring invoice. Specify who the Buyer is and what it concerns to make it easier to find in the future and to maintain order in the documentation. Invoices can be filtered alphabetically or by the order of their creation in the system. You can also set a name based on a previously issued proforma invoice, where the data (such as day, month, year) will be variable, eg, Four Pawns - Marketing Service June 2021, Four Pawns - Marketing Service 01/2022.
In this regard, you can utilize the following variables:
- {{year}} - year,
- {{day}} - day,
- {{month}} - month,
- {{previous_year}} - previous year,
- {{next_year}} - next year,
- {{previous_month}} - previous month,
- {{next_month}} - next month,
- {{month_in_words}} - month in words,
- {{previous_month_in_words}} - previous month in words,
- {{next_month_in_words}} - next month in words,
- {{month+1}}, {{month+2}}, {{month+3}} ... - one/two/three months ahead,
- {{month_in_words+1}}, {{month_in_words+2}}, {{month_in_words+3}} ... - one/two/three months ahead in words,
- {{month-1}} {{month-2}} {{month-3}} ... - one/two/three months back,
- {{month_in_words-1}} {{month_in_words-2}} ... - one/two/three months back in words.
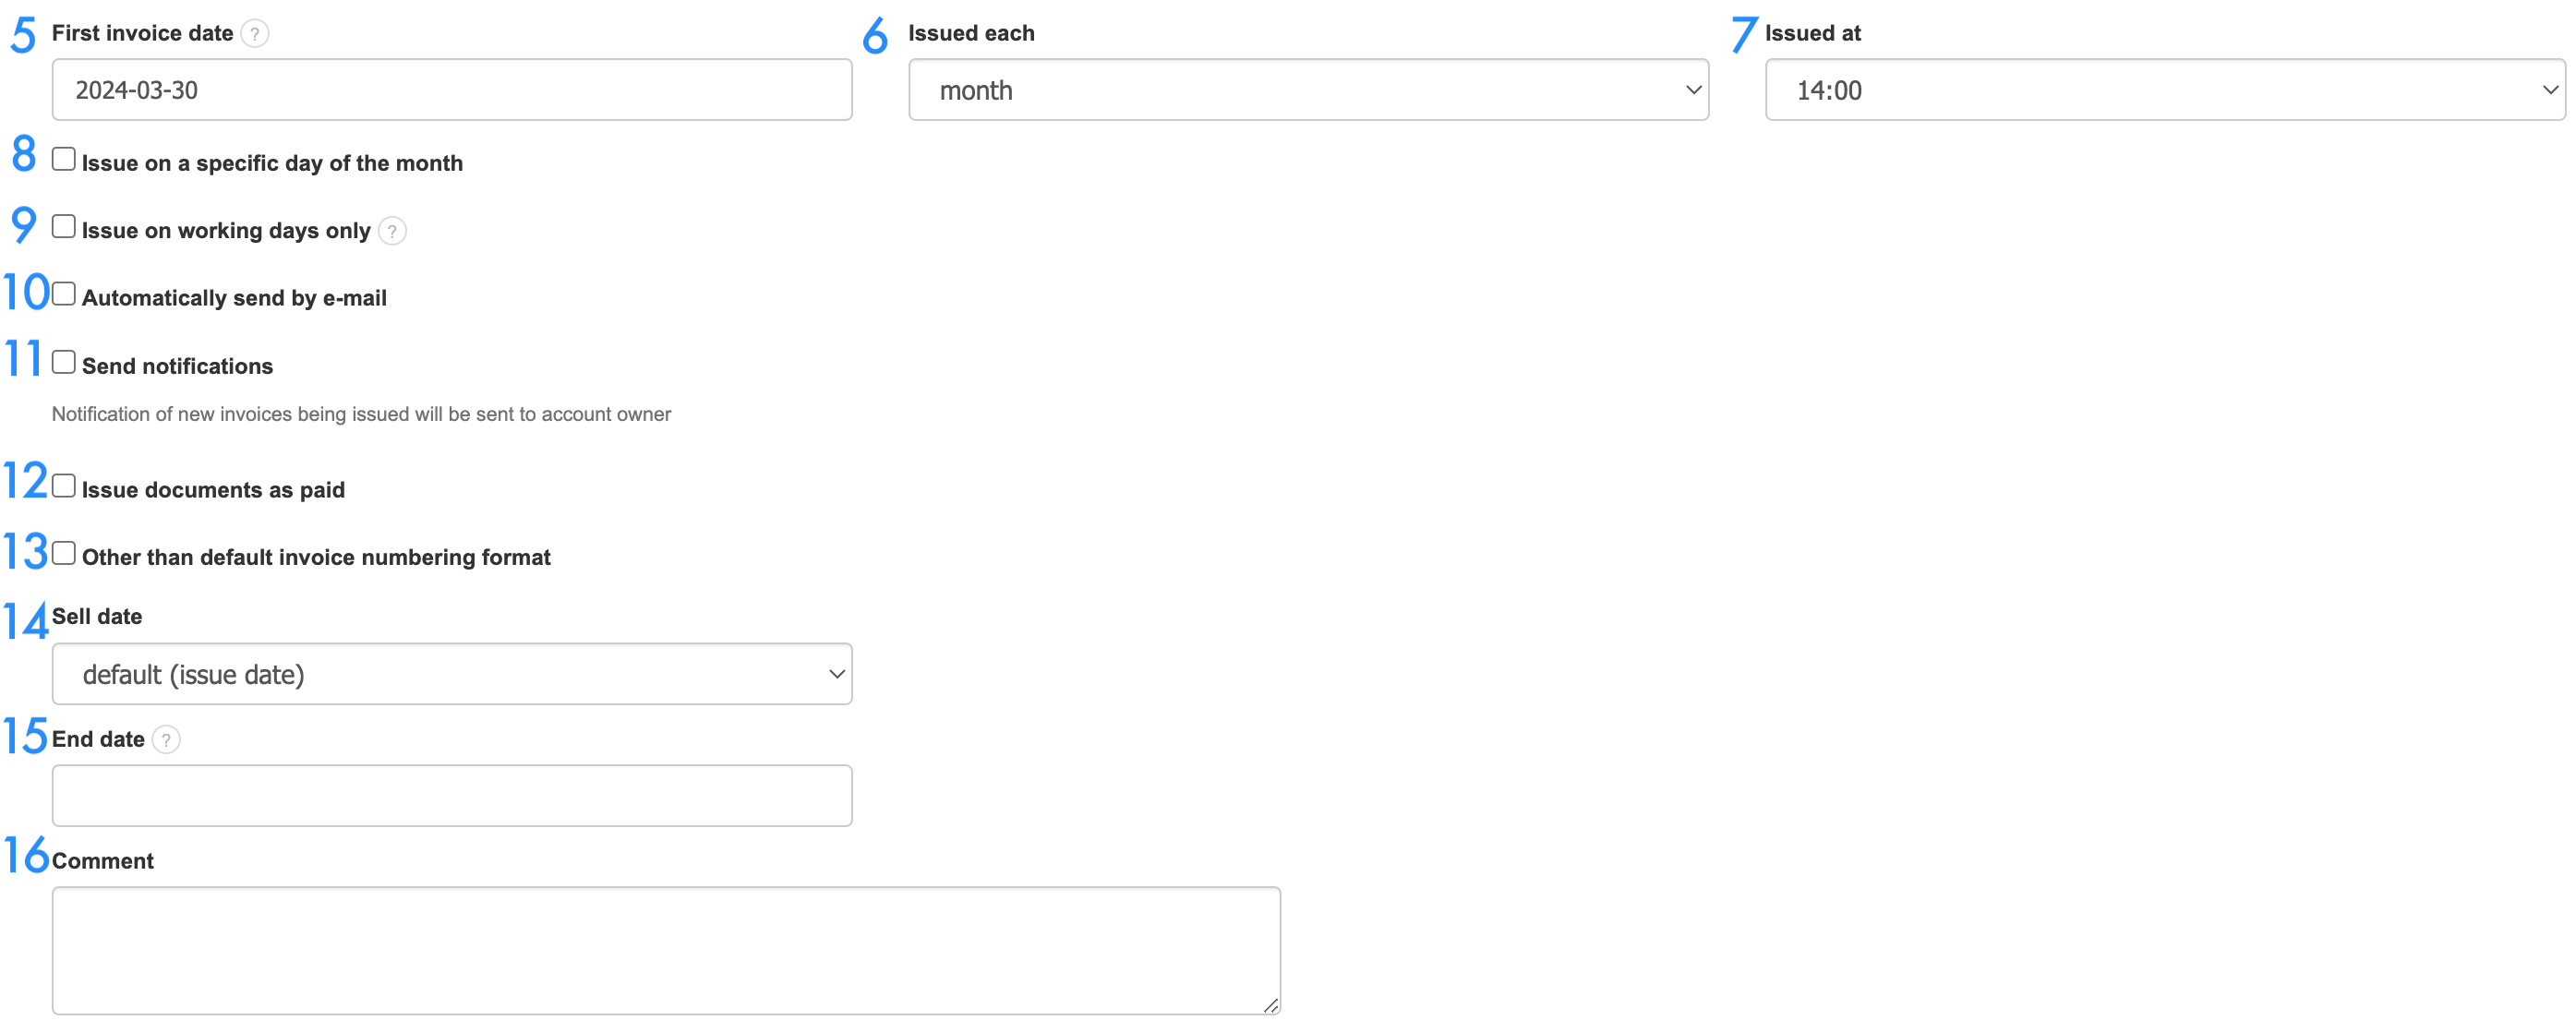
5. First Invoice date: here, choose the date from which you want to start your cycle and automatically issue recurring invoices. The first invoice can be generated and sent, for example, on June 20th, while subsequent invoices, for example, every 1st day of the following month (July 1st, August 1st, etc.) - see item 8. Issue on a specific day of the month .
6. Issued each: here, you can specify the frequency at which subsequent invoices should be generated (weekly, monthly, every 2 months, every 3 months, every 6 months, annually).
6. Issued each: here, you can specify the frequency at which subsequent invoices should be generated (weekly, monthly, every 2 months, every 3 months, every 6 months, annually).
7. Issued at: select the exact time for sending invoices from the available options. However, please note that if you set the recurring invoice issuance time between 24:00 - 02:00, there may be delays in the system's issuance of invoices (the delay is up to 24 hours). This is related to the time zone of the servers where the InvoiceOcean.com system data is stored. We recommend changing the automatic invoice issuance time to 02:00 - 03:00 or later hours than the default setting.
8. Issue on a specific day of the month: you have the option to specify a specific, fixed day from 1 to 31 throughout the month on which each subsequent recurring invoice will be sent.
9. Issue on working days only: when checked, this function ensures that invoice generation occurs only on business days, i.e., from Monday to Friday, regardless of whether any of them are legally non-working days. If the issue date falls on a Saturday or Sunday, the program will issue the invoice with a one or two-day delay. In the situation where the invoice is scheduled to be generated on the last day of the month, which falls on a Saturday or Sunday, the invoice will be issued on the last business day of that month, eg, January 31st falls on Sunday, the invoice will be sent on January 29th, Friday.
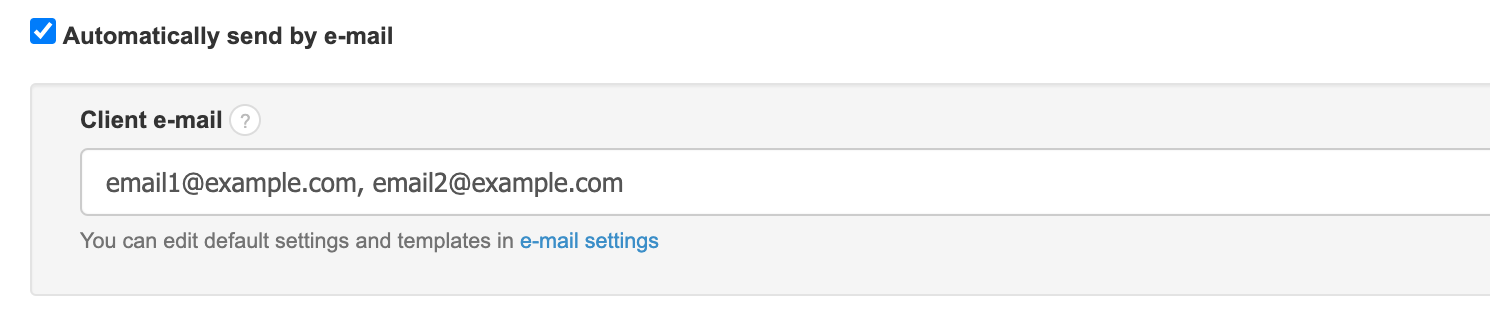
10. Automatically send by e-mail: in the window that appears after selecting this option, you can enter the client's email address to which the program should automatically send the invoices after they are issued. The system allows sending the invoice to up to 5 different email addresses. After each address, use a comma "," eg, email1@example.com , email2@example.com .
11. Send notifications : Enabling this option will send a notification to your email when a new recurring invoice is issued. After issuing the recurring invoice and setting the frequency of issuance, no additional actions need to be taken (apart from, for example, downloading them in PDF or sending them).
12. Issue documents as paid : If you select this function, invoices generated by the program will be marked as paid.
13. Other than default invoice numbering format : If you prefer a personalized way of numbering invoices, you can specify a separate numbering format for documents in this section or choose from the sample formats provided by the program.

14. Sale date : here you have several options to choose from:
- Default (Issue date),
- Only year and month,
- Last day of the month,
- "X" day of the previous month,
- "X" day of the same month,
- "X" day of the following month.
"X" represents a number corresponding to a specific day of the month from 1 to 31. The selected day can be up to one month away from the invoice issuance date.
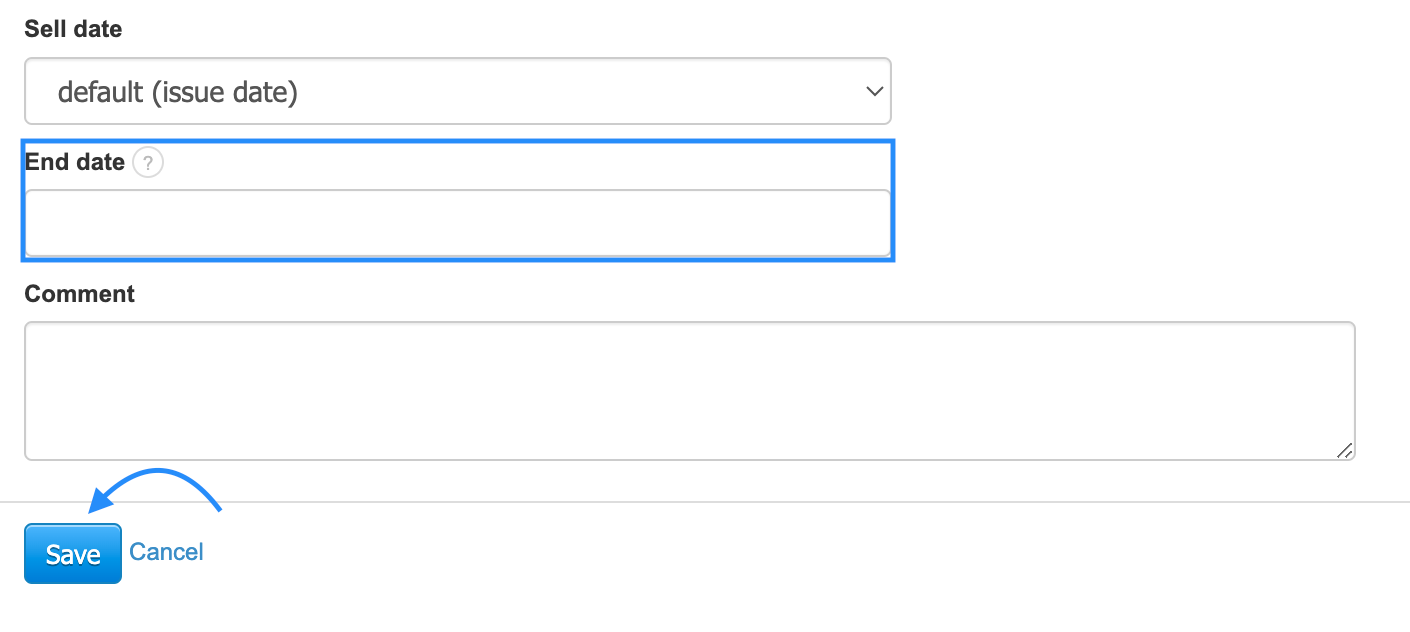
15. End date: you can specify and select the date when you want to end the automatic invoice generation cycle for a particular customer. This is also the way to deactivate the recurring invoice function.
16. Comment : here you can include a note for the created invoice cycle or other relevant information you want to include for this document.
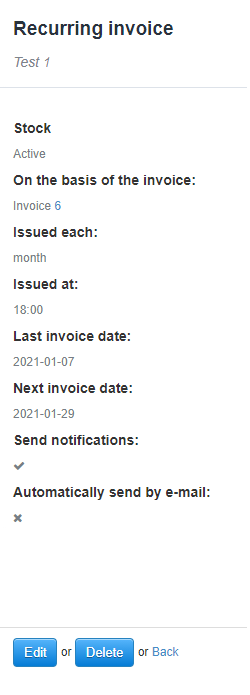
Afterward, click Save , and thus, after configuring the cycle, you can check its basic parameters and the list of invoices issued based on it.
Afterward, click Save , and thus, after configuring the cycle, you can check its basic parameters and the list of invoices issued based on it.
In the menu of the recurring invoices list, you will find the following filters: Enter keyword , Client , Department and Type. These filters will facilitate faster searching for invoice data within cycles.
- The Enter keyword filter searches for a phrase contained in the description and the basis of the recurring invoice.
- The Client filter brings up a list of proposed clients after typing the first letter.
- The Department filter allows you to select recurring invoices within a specific department of the company, or if you manage multiple companies, you can choose recurring invoices for a specific one.
- The Type filter allows you to filter between Income and Expenses.
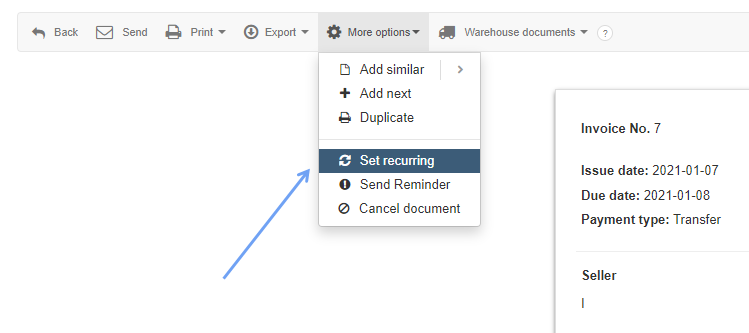
SECOND SOLUTION
Another method of generating recurring invoices is to preview the selected invoice, based on which you want to generate the cycle, and in the context menu, select the option: More options > Set recurring.
Note: An important option during the generation of recurring invoices is to change the name of the product with each subsequent generated recurring invoice. This is particularly useful for subscription sales. In the product name, you can include variables such as week, month, year, which automatically differ with each recurring invoice. Full information can be found here .
How to delete a recurring invoice cycle?
To correctly delete a recurring invoice cycle created in the system, you must first specify the date when you want automatic invoice generation within the cycle to be turned off. Simply removing the cycle from the list will not stop the creation of subsequent documents according to the settings.
To deactivate the cycle, select the previously created cycle from the list and enter its summary by clicking on its Name. Then use the Edit button to make changes to the cycle. At the bottom, you will find the End Date field. From the calendar, which is visible after clicking on the field, select the date and confirm the changes by clicking the Save button. Using this option will stop the uncertainty of subsequent documents. You can leave such a cycle on the list of recurring invoices as inactive or delete it using the gear icon on the right side.
To deactivate the cycle, select the previously created cycle from the list and enter its summary by clicking on its Name. Then use the Edit button to make changes to the cycle. At the bottom, you will find the End Date field. From the calendar, which is visible after clicking on the field, select the date and confirm the changes by clicking the Save button. Using this option will stop the uncertainty of subsequent documents. You can leave such a cycle on the list of recurring invoices as inactive or delete it using the gear icon on the right side.
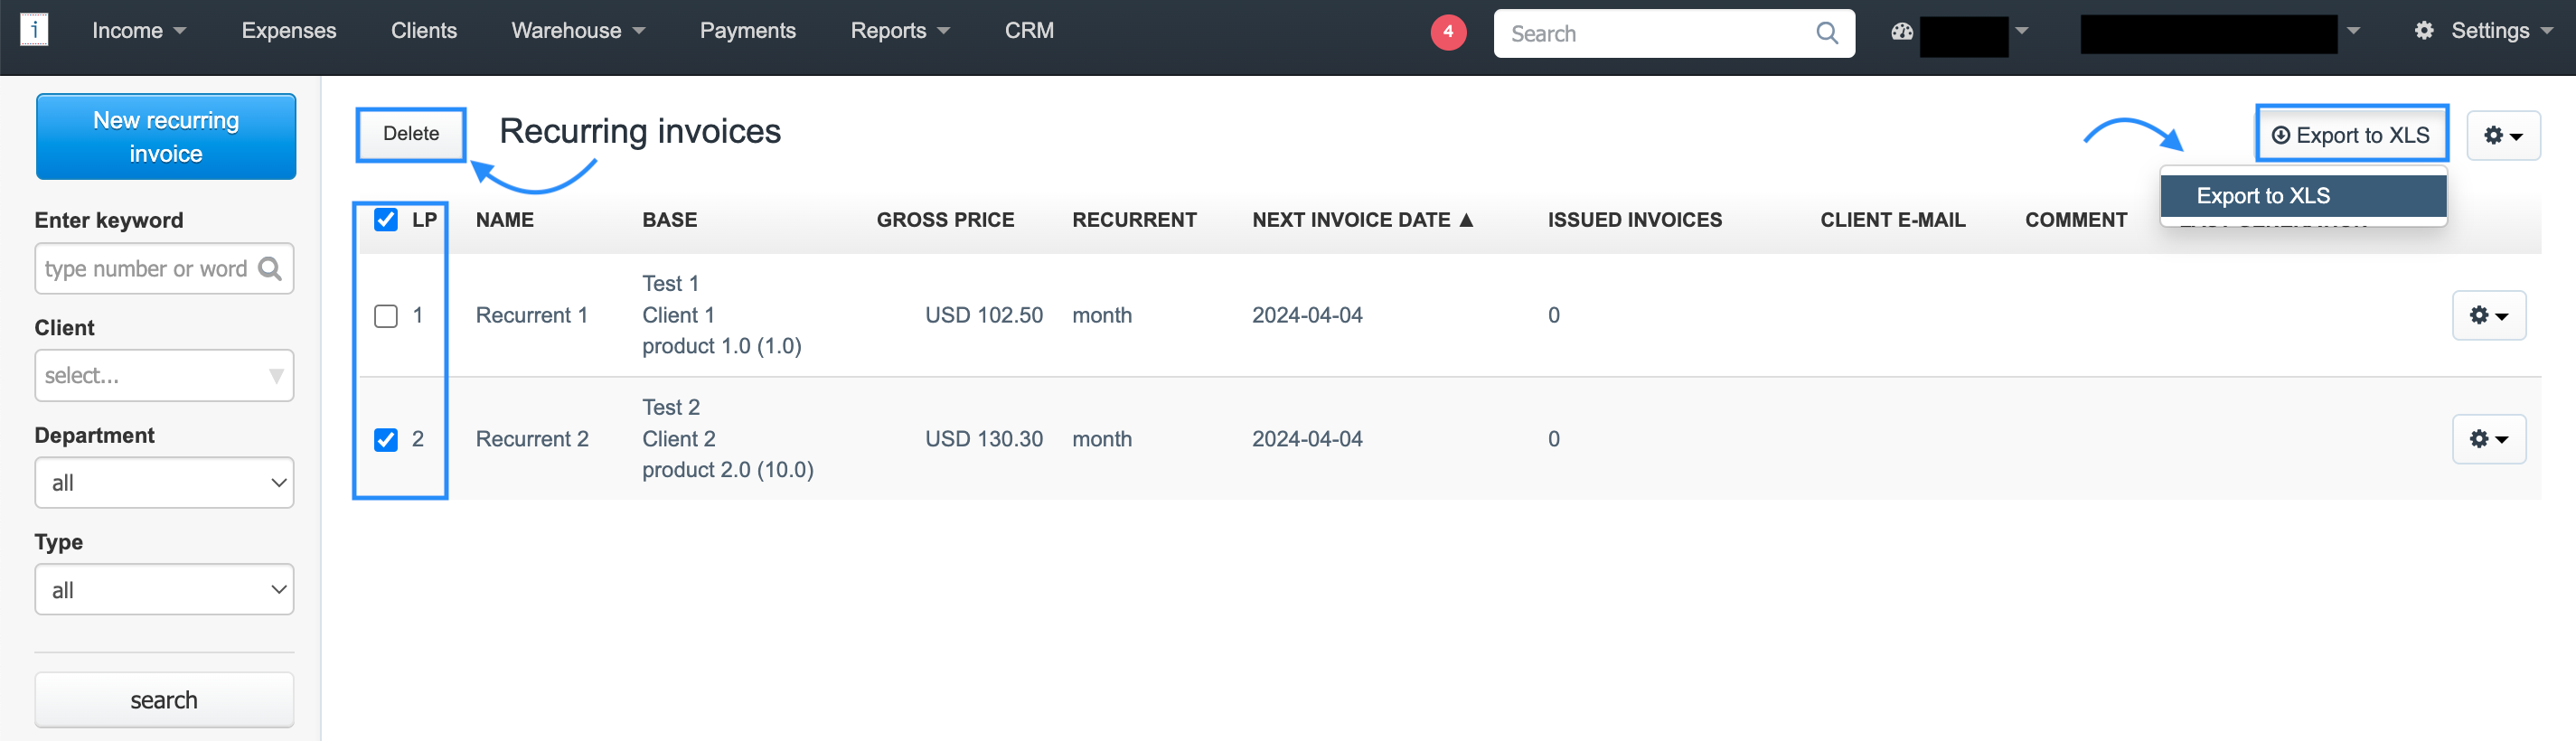
How to mass delete or export cycles?
In the list of cycles, checkboxes are visible next to each entry, allowing you to perform mass actions for more than one cycle.
This enables you to:
- Mass delete selected cycles;
- Export only selected cycles to an xls file.
Previously, the system only allowed deleting cycles individually, and the export option applied to all cycles without the ability to choose which data to export.
After selecting the checkboxes next to the chosen cycles, you can delete them by clicking the Delete button above the list of cycles or export the data using the Export to XLS button.