InvoiceOcean gives you the possibility to send emails from the system in such a way that they appear as if they were sent from your own email inbox. This option is available in the Enterprise plan.
To use this option, you need to configure the sending process. Follow these steps:
- Go to Settings > Account Settings > Invoice sending.
- Check the box for Use own name
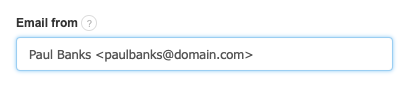
- Enter in the Email from field the email address you want to use for sending emails to your customers. In this example, we will use the address: Paul Banks <paulbanks@domain.com>
DNS Configuration
If you are using the Use own name option, we suggest that you also set up the appropriate DNS configuration in your domain (the one from which emails are sent). To do this, contact the person managing your domain or find a place where you can configure the DNS of your domain independently.
You should add a TXT record to the domain's DNS (which acts as permission for InvoiceOcean to send emails) with the following value:v=spf1 mx include:spfa.invoiceocean.com ~all
Without this configuration, your emails with invoices may not reach the recipients or may be marked as spam.
It's possible that there is already a TXT record starting with v=spf. in your domain's DNS. In that case, instead of adding a second entry, you can extend the existing entry to grant permission for InvoiceOcean to send emails.
To do this, add the phrase include:spfa.invoiceocean.com in the TXT record of the domain, just before: ~all, -all, +all or ?all
You can check the correctness of the entry here.
DKIM Configuration
Additionally, in Enterprise accounts after configuring SPF, you can set up DKIM. For this, go to Settings > Account settings > Invoice sending.
With the Use own name field filled out, click the DKIM settings button.
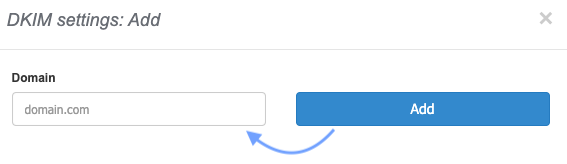
A filed will appear to enter the domain, where the system will suggest the domain from the previously filled email address in the Use own name section.
In this field, you can change the domain value.
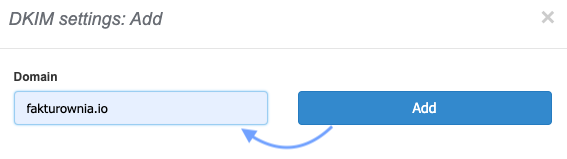
After validating the data and clicking the Add button, the system will show you in a new window the expected DKIM record values.
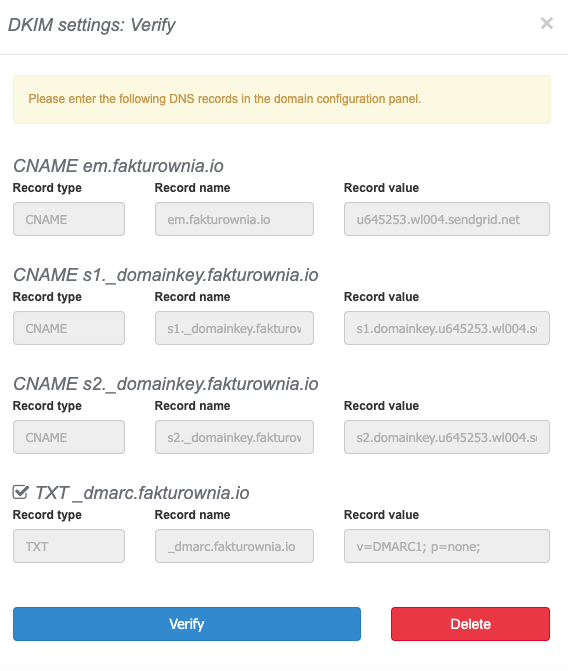
At the top of the window, there's a message reminding you of the need to enter DNS records in the domain management panel.
Subsequently, in dedicated fields, the record names are provided, divided into: record type, record name, record value.
For DKIM, we have the following record types: CNAME em, CNAME s1._domainkey, CNAME s2._domainkey, TXT_dmarc.
After adding the records in the domain management panel, you can return to the InvoiceOcean window and verify the records using the Verify button.
If you change your mind or make a typo in the domain, you can delete the DKIM configuration using the Delete button and add a new one with a different domain.
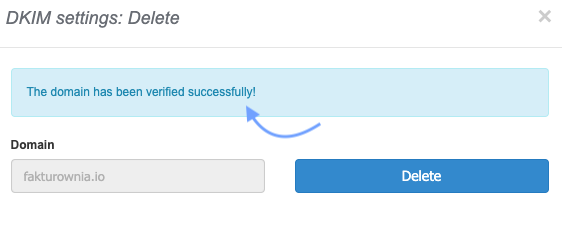
Once the DNS records have been verified, the system will display the message: The domain has been verified successfully!
The system allows adding one domain per account in this way. Once a domain is added and you click on the DKIM Settings option, you'll still see the prompt for successful verification. If you wish to add DKIM for another domain, you need to remove the previously added domain using the Delete button.
DKIM and the "Separate configuration for sending documents by email" option within departments
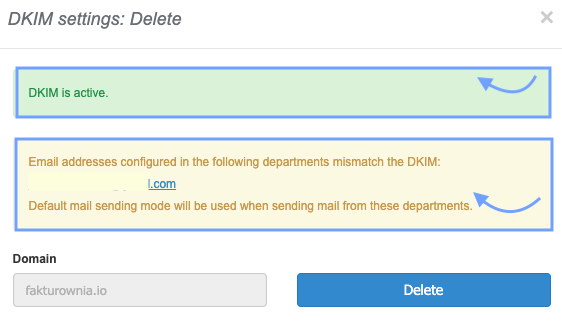
When you use the Separate configuration for documents sent by email option within departments and the email addresses entered under separate email sending do not fall within the scope of a single domain (the one for which DKIM is already active), the system will notify you accordingly.
After clicking the DKIM Settings button, the system will display a message, where in a green box, you'll see the information that DKIM for the main domain is already active.
Then, the system will display a message in a yellow background, indicating which departments and email addresses, with separate sending settings, do not fall under the domain with added DKIM. Default email sending will be applied to these departments, detailed description of which you can find in this article → Sending invoices by email - default settings
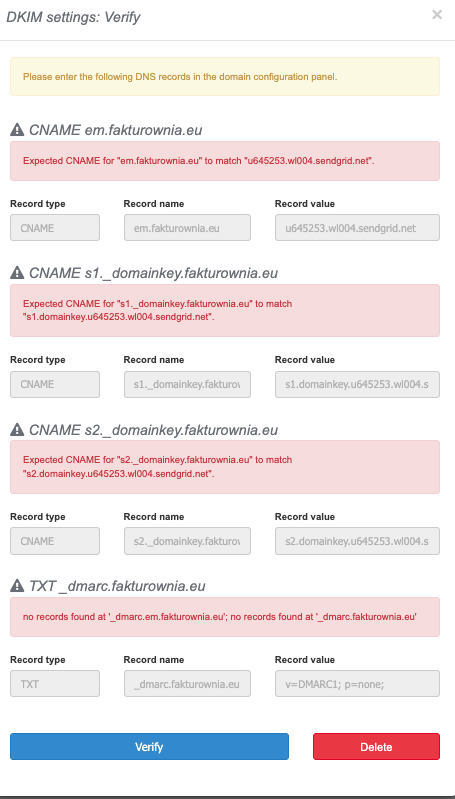
In case of unsuccessful DNS record verification, the system will display an error message above each record:
→ Error Expected CNAME for 'X' to match 'Y' indicates that the CNAME record for domain 'X' does not match the expected value 'Y'.
This error could be caused by a typo when filling out the record, mistakenly creating a DNS record of a different type or in a different domain. Check if you made a typo in the domain name. If the domain name seems correct, manually verify the records using this page → manual record verification.
Propagation of DNS record changes may take up to an hour, and in extreme cases, even a day. If you've done everything correctly and the records are still not visible, try again later.
→ Error no records found at '_dmarc.em.fakturownia.eu' indicates that no valid DMARC records were found on any of the provided domains, of which there may be several.
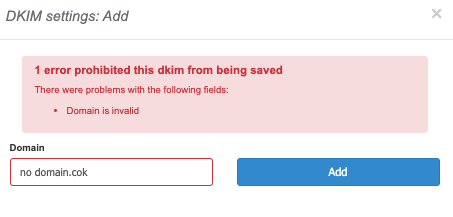
In case of entering a completely incorrect domain, the system will display a message: The domain is invalid.